
Custom shirt measurements are the heartbeat of a truly tailored wardrobe, guiding every cut and seam. This guide covers how to measure for a shirt with repeatable steps, turning raw numbers into tailored shirt measurements that move with you. Use a reliable shirt size guide to interpret the numbers and translate them into a precise fit. A true fit comes from careful measuring chest neck waist for shirts and aligning those figures with your fabric choice and style. With consistent practice, your measurements become a foundation for a custom shirt fit that looks sharp, feels effortless, and lasts.
Beyond numbers, a well-fitting shirt comes from a robust measurement mindset that feeds pattern drafting and garment fit. Pattern drafting, ease allocation, and fabric behavior all rely on reliable body metrics such as chest, neck, and waist. Think in terms of a size chart and a disciplined measuring routine so the finished shirt drapes smoothly and moves with you. Using these related terms and concepts helps align the topic with search intents while preserving clarity for readers.
Understanding the Core Measurements for a Perfect Shirt Fit
Understanding the core measurements that drive a shirt’s silhouette is the foundation of any successful custom build. Key dimensions such as chest, neck, shoulder width, sleeve length, and waist create the blueprint from which the pattern is drafted. When these landmarks are accurate, you gain clarity on how much ease to allow and where the garment should hug or relax. This knowledge makes the difference between a shirt that reads as tailored and one that feels generic.
Translating measurements into a reliable size begins with a trusted shirt size guide and a consistent measuring method. By focusing on the chest, neck, and waist in relation to your body type, you can predict how a given style will drape across the torso. In the world of custom shirt fit, those numbers become the starting coordinates for a pattern that moves with you rather than fighting against you.
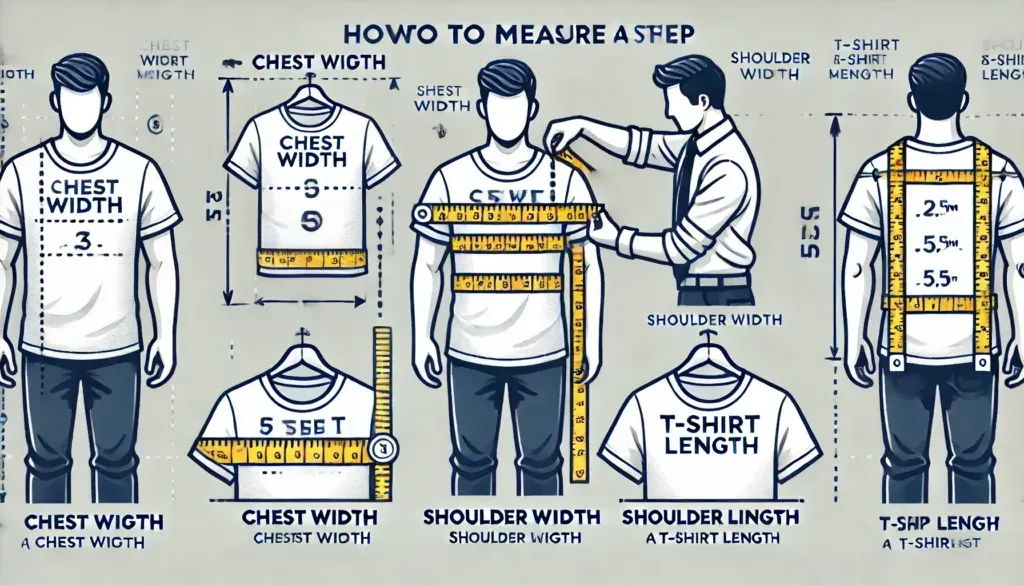
A Step-by-Step Method for Accurate How to Measure for a Shirt
To minimize distortion and capture repeatable results, follow a practical, repeatable measuring routine. Gather a soft sewing-tape, wear close-fitting underlayers, stand straight, and enlist a second pair of eyes when possible. The environment matters: good lighting, a clear mirror, and note-taking help you trace the landmarks you’ll rely on when translating measurements into pattern decisions.
With a routine in place, you’ll measure chest, neck, shoulder width, sleeve length, and waist with consistent landmarks. Document each figure, compare it to your body type, and think about the intended fit—whether you prefer a little extra ease or a closer silhouette. This is the essence of how to measure for a shirt, and it underpins a coherent approach to measuring chest neck waist for shirts and building a true shirt size guide around your measurements.
custom shirt measurements: Turning Numbers into a Tailored Pattern
Once you have your numbers, the next step is translating them into a pattern that anticipates movement and posture. This is where the concept of tailored shirt measurements comes into play: your chest and waist determine width, while the neck, sleeve length, and shoulder width guide balance and range of motion. A professional pattern maker will use these inputs to draft a baseline that can be refined through fittings, ensuring the final garment aligns with your body’s contours.
Beyond raw figures, consider intended ease, fabric behavior, and the specific shirt style. The pattern should reflect a true custom shirt fit—neither overly clingy nor baggy—by balancing the core measurements with deliberate allowances. Documented measurements, when paired with a skilled tailor, translate into a garment that looks and moves like it was crafted just for you, and this is the heart of turning numbers into a tailored pattern.
The Role of Fabric Choice and Shrinkage in Shaping Final Measurements
Fabric selection directly affects the final silhouette you’ll wear. Natural fibers such as cotton, linen, or wool can relax or shrink after washing, altering how a shirt sits across the chest, waist, and sleeves. Working with fabric that has pre-shrunk finishes or talking shrinkage allowances with your tailor helps you protect the integrity of your measurements. The shirt size guide you rely on should account for post-wash behavior, ensuring the final fit remains true after laundering.
Discuss shrinkage expectations early in the process, and consider adding a small amount of ease to critical areas if the fabric is known to shrink. Your tailored shirt measurements should reflect not just the numbers at sending, but the way the fabric will settle after washing. This proactive approach reduces the risk of surprise adjustments and supports a reliable custom shirt fit over time.
How to Measure for a Shirt: Practical Steps and Common Pitfalls
This section revisits practical steps with a focus on everyday accuracy. Prepare your tools, wear appropriate underlayers, and use repeatable landmarks so your measurements translate reliably into a shirt size guide. Practical measurement should minimize distortion and be repeatable across different orders or alterations to keep your custom shirt fit consistent.
Be mindful of typical pitfalls: measuring over bulky clothing, failing to account for movement, or rounding numbers inconsistently. The overlap among measuring chest neck waist for shirts, neck, and sleeve lengths requires a disciplined approach. Following a tested method will reduce errors and yield a more predictable final fit, helping you achieve a reliable custom shirt fit with each order.
Achieving a True Custom Shirt Fit: From Shoulder to Hem
A true custom shirt fit starts with a mindful balance of ease, drape, and proportion from the shoulder line to the hem. The shoulder alignment and sleeve cap influence range of motion, while chest and waist ease determine the garment’s silhouette. A well-considered approach to shoulder width and shirt length ensures movement remains unhindered whether you’re seated, reaching, or typing.
Beyond the numbers, the fit comes alive when fabrication and pattern decisions work together. Cuffs, collar performance, and hem length all hinge on deliberate tailored shirt measurements that anticipate your everyday motions. When the pattern is built to move with you, the result is a crisp, lasting appearance that feels as good as it looks, no matter the occasion.
Frequently Asked Questions
How to measure for a shirt: how do I take accurate custom shirt measurements for a truly tailored shirt fit?
Start with a soft measuring tape, wear close-fitting undergarments, and stand straight. Measure chest at the fullest part, neck at the base of the neck, and shoulder width across the back; then record sleeve length (from the shoulder seam to the cuff or from the center back neck to the wrist, depending on your pattern). Include waist and, if needed, hip, and shirt length from back center neck to hem. Repeat for accuracy and note any preference for extra ease. Have a partner assist for tricky areas to reduce distortion.
What is the role of a shirt size guide when using custom shirt measurements?
A shirt size guide helps translate raw numbers into a usable pattern size. Use chest as the primary determinant, ensure appropriate neck ease for comfortable collar fit, match sleeve length to your pattern method, and check shoulder width for proper drape. Also account for fabric shrinkage and whether you want a tucked (formal) or untucked (casual) silhouette.
Why is measuring chest neck waist for shirts crucial when using custom shirt measurements?
Measuring chest defines torso width, neck determines collar comfort, and waist informs taper and balance. When combined, these core measurements guide pattern choices for ease, drape, and overall fit across the shirt. Always consider how your body shape affects the final silhouette and adjust accordingly.
How can I ensure a tailored shirt measurements approach yields correct sleeve and cuff fit?
Use a consistent sleeve measurement method (center back neck to wrist or shoulder seam to cuff) and apply it across orders. Measure sleeve length with the arm relaxed, and consider bicep circumference for a closer or looser cut. Ensure shoulder alignment with the natural shoulder and verify the cuff style and desired ease around the wrist.
What common mistakes should I avoid when taking custom shirt measurements?
Avoid measuring over bulky clothing or with a tape that’s too loose, which skews numbers. Don’t rush without repeating, and maintain a consistent rounding approach. Don’t forget to update measurements after significant weight changes or growth, and always record a clear measurement sheet for future orders.
How should fabric shrinkage and shirt length considerations affect your custom shirt measurements?
Choose fabrics with pre-shrunk finishes when possible, or add extra ease in your custom shirt measurements to compensate for shrinkage after washing. Plan shirt length for the intended wear (tucked vs untucked) and adjust the back center neck to hem measurement accordingly. Discuss shrinkage expectations with your tailor to ensure the final fit remains true to your measurements.
| Key Point | |
|---|---|
| Introduction | Measuring, sizing, and fit are the true pillars of a great custom shirt. A shirt that doesn’t fit properly will feel off and underperform, regardless of fabric or stitching. The guide emphasizes turning accurate custom shirt measurements into a pattern that moves with you. |
| Why accurate measurements matter | Small discrepancies in chest or neck can cause tight sleeves, awkward collars, or excess fabric. In bespoke or made-to-measure shirts, measurements become the blueprint for the entire garment, guiding size, ease, collar position, and cuffs. |
| What you’ll learn |
|
| Key measurements for shirts |
|
| How to measure for a shirt |
|
| Interpreting measurements into a size guide | Translate numbers into a pattern by using chest for width, neck for collar ease, sleeve length for wrist fit, and shoulder for natural drop. Consider fabric shrinkage and choose suitable ease for untucked or tucked styles. |
| Tailored shirt fit |
|
| Fabric, shrinkage, and their impact | Fabric choice affects final fit; natural fibers can shrink. Plan for slight size adjustment or pre-shrink, and discuss shrinkage allowances with the tailor. |
| Body types and tailored shirt measurements | Different body shapes require tweaks (e.g., broader shoulders with tapered waist; longer sleeves for tall frames). A tailor can translate preferences into an adjusted pattern while preserving core measurements. |
| Practical tips to get the most accurate measurements |
|
| Common pitfalls and how to avoid them |
|
| Practical example: turning measurements into a shirt size | Core measurements example: Chest 42 in, Neck 16 in, Shoulder 17 in, Sleeve 34 in, Waist 36 in, Shirt length 32 in. A pattern is chosen to fit these numbers with appropriate ease to achieve the intended silhouette. |
| Fabric and care notes: planning for longevity of fit |
|