
Remove Embroidered Patches from your favorite jacket, bag, or shirt to refresh your look and express your personal style with minimal effort. This practical guide shows how to remove patches from clothing safely, with clear steps and tips to ensure the process is gentle on fabric. Understanding patch types—iron-on, sew-on, or fabric-backed—helps you choose the best removal method and prevents fraying, puckering, or leftover residue. You’ll also learn how to reuse embroidered patches on new garments and relocate patches on clothing for a fresh arrangement. With easy tools and clear patch removal tips, you’ll preserve fabric while updating your wardrobe.
Think of this as a design refresh rather than a repair, where removing patches from clothing becomes a careful craft and you can remove embroidered patches from clothing when needed. Using Latent Semantic Indexing concepts, we talk about related ideas like removing appliques, taking off fabric decorations, or transferring embroidery to another garment. These terms connect to related materials such as denim, cotton, and knits and to methods that combine heat, stitching, or adhesives. Once the patch is detached, you can relocate it to a new spot or repurpose it for another project while keeping the fabric intact. Together, these approaches reflect practical patch removal tips and encourage creative reuse across your wardrobe.
Remove Embroidered Patches: Safe, Step-by-Step Techniques to Preserve Fabric
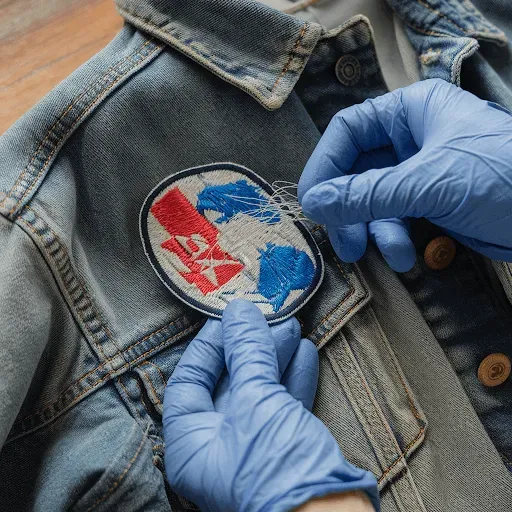
Before you start removing any embroidered patch, assess both the patch type and the fabric underneath. Whether the patch is iron-on, sew-on, or fabric-backed with heat-activated adhesive, knowing how it is attached guides your approach and helps you Remove Embroidered Patches without causing unnecessary damage to the garment. Testing a hidden area first can reveal how the fabric will respond to heat, solvents, or stitching, reducing the risk of unexpected fraying or puckering.
With understanding in place, prepare your workspace and select the appropriate method. For sew-on patches, use a sharp seam ripper to lift stitches in small sections and remove threads with tweezers. For iron-on patches, apply a low heat with a pressing cloth and gently lift the edge as the adhesive softens. This step-by-step approach aligns with thoughtful patch removal tips and prioritizes fabric integrity while you remove embroidered patches from clothing.
How to Remove Patches from Clothing: Tools, Safety, and Methods
Equipping yourself with the right tools makes the process smoother and safer. A sharp seam ripper, fine scissors, tweezers, and a small amount of rubbing alcohol or a fabric-safe adhesive remover are essential for clean results when you’re learning how to remove patches from clothing. Keep a clean cloth handy to blot away any adhesive residue instead of rubbing it deeper into the fabric.
Safety and care go hand in hand. Work in a well-ventilated area and protect the surface you’re working on with a towel or cutting mat. Test any solvent on an inconspicuous spot to avoid discoloration. After you’ve detached the patch, gently remove adhesive residue from the fabric and launder as directed by the care label to prevent setting any sticky film that could attract dirt.
Reuse Embroidered Patches: Creative Ways to Give Patches a Second Life
Reuse embroidered patches is a fantastic way to extend their life and revitalize new garments. Start by selecting patches that complement the fabric’s color, weight, and weave. Clean and inspect each patch for loose threads or backing material so they’re ready for a fresh project. This approach not only saves money but also supports upcycling ideas for denim, canvas, and sturdy cottons.
Once you’ve chosen the patches, decide how you’ll attach them to a new garment. Sew-on patches benefit from a tight zigzag or blanket stitch around the edge, while iron-on patches can be reinforced with stitches for longevity. Preparing the surface with a light press and marking placement with pins or chalk ensures precise alignment, letting you maximize the impact of your reused embroidered patches.
Relocate Patches on Clothing: Planning, Attaching, and Longevity
Relocating patches on clothing gives you a fresh look without purchasing new adornments. Start with careful layout planning—take photos or sketches of the intended arrangement to review the design before you start. If you’re moving a patch from one area to another, remove the old patch first using the methods above and ensure the fabric is clean and free of adhesive or loose threads.
Prepare the new spot for attachment by stabilizing the fabric and, if needed, fusing a lightweight interfacing to prevent puckering. Attach the patch securely using sewing or ironing methods suitable for the patch type, then reinforce with additional stitching for durability. Afterward, test the placement by wearing the garment briefly and checking the patch after a wash to ensure it remains in place.
Patch Removal Tips and Common Pitfalls: Avoid Damaging Your Garments
Even small mistakes can lead to fabric damage when removing patches, so follow patch removal tips to minimize risk. Rushing the process or tugging on patches without cutting the threads can create holes. Always work in small sections, lift edges gently, and remove stitching before peeling away the patch. Testing on hidden areas first helps you anticipate how the material will react to heat, solvent, or mechanical action.
Be mindful of fabric type and backing materials. Some patches combine heat-activated adhesive with stitching, which may require a sequence of steps to avoid fraying or residue. Use gentle solvents and dab—don’t rub—when cleaning adhesive residue, and choose products that are proven safe for the garment’s fabric to prevent discoloration or texture changes.
From Old to New: Care and Maintenance for Reused Patches on New Garments
After you’ve reused patches or relocated them to a new garment, ongoing care helps you preserve their appearance and longevity. Turn garments inside-out before washing to reduce friction around the patch edges, and opt for a gentle cycle with cold water. Air-drying is ideal, but if you use a dryer, choose a low-heat setting to protect the patch and fabric.
Regular inspection keeps patches looking fresh. Re-stitch edges if you notice looseness, reapply adhesive if needed, and store any leftover patches flat to prevent curling. By following these patch maintenance practices, you’ll extend the life of your upcycled designs and enjoy the satisfaction of seeing old patches find new life on fresh garments.
Frequently Asked Questions
How do I Remove Embroidered Patches from Clothing safely and effectively?
Identify patch type and test a hidden fabric area. For sew-on patches: lift the edge with a seam ripper, cut the stitches, and use tweezers to remove threads; trim tails and reinforce the edge if needed. For iron-on patches: apply a low heat with a pressing cloth, gently lift and peel the patch, then remove adhesive residue with rubbing alcohol or a fabric-safe adhesive remover; launder as directed on the care label. If a patch combines heat and stitching, you may need to cut around it first and then remove stitching to minimize fabric distortion.
What is the best way to remove patches from clothing when they use heat-activated adhesives?
Use the heat method safely: start with a low iron setting and a pressing cloth, then gently lift the patch edge and peel away. After removal, blot away any adhesive residue with rubbing alcohol or a mild adhesive remover and launder the garment to prevent residue from setting.
How can you reuse embroidered patches on a new garment?
Choose compatible fabrics, decide on sew-on or iron-on attachment, and prepare the surface by cleaning and flattening. For sew-on, apply a blanket stitch or tight zigzag around the edge; for iron-on, follow the patch instructions and consider adding a row of stitches for extra security. Finish with a light press and let the garment cool before handling.
How do you relocate patches on clothing without causing damage?
Plan the layout first and mark placement with pins or chalk. Remove the old patch if needed, stabilize the area with interfacing to prevent fraying, then reattach the patch using sewing or heat according to the patch type. After attachment, test wear and check after washing to ensure the patch stays in place.
What are practical patch removal tips for delicate fabrics?
Take your time and work in small sections to avoid fabric tears. Cut the stitching rather than pulling on the fabric, and always test any adhesive removers on a hidden area. Use the right tools (seam ripper, tweezers) and avoid aggressive solvents that could damage delicate fibers.
What care steps should I follow after removing or relocating embroidered patches?
Turn garments inside out before washing, use a gentle cold-water cycle, and air-dry when possible. If you must use a dryer, choose low heat. Inspect patches after washing and re-stitch or re-adhere as needed, and store leftover patches flat to keep them in good shape.
| Aspect | Key Points | ||
|---|---|---|---|
| Patch Types | Iron-on, sew-on, or fabric-backed with heat-activated adhesives; type guides removal method and fabric safety. | Fabric Considerations | Fabric content and weave affect fraying and distortion. Test on a hidden area. Denim and cotton are more forgiving; delicate knits may fray. |
| Fabric Considerations | Fabric content and weave affect fraying and distortion. Test on a hidden area. Denim and cotton are more forgiving; delicate knits may fray. | ||
| Tools and Safety | Seam ripper, small scissors, tweezers or needle-nose pliers, fabric-safe adhesive remover or rubbing alcohol, cloth or cotton swab, pins/chalk, pressing cloth and iron, matching thread. | ||
| Preparing the Garment | Assess patch type and fabric; identify stitching; plan a gentle approach to minimize distortion. | ||
| Removing Sew-On Patches | Steps: Start at a corner with a seam ripper to lift the edge; Work in small sections cutting threads; Pull threads with tweezers; Clip tails; Inspect for fraying and reinforce if needed; Remove remaining stitches. | ||
| Removing Iron-On Patches | Steps: Use low heat with a pressing cloth; Gently lift edge and peel; Reapply heat if needed; Remove adhesive residue with rubbing alcohol or a mild adhesive remover; Launder according to care label. | ||
| Adhesive Residue Care | Test removers on hidden area; blot with a cloth dampened with isopropyl alcohol or adhesive remover; for stubborn residues, consider cautious use of mayonnaise or peanut butter, then wash to remove grease. | ||
| Reusing Patches on New Garments | Choose compatible fabrics; decide sew-on or iron-on; prepare the surface; attach with appropriate stitches; finish with a light press and cool before handling. | ||
| Relocating Patches | Plan the layout; remove the old patch; prepare the new spot (stabilize if needed); attach securely; test and wear; check after washing. | ||
| Care After Patching | Turn garments inside out before washing; use gentle cold cycle; air-dry when possible; inspect patches after washing and re-stitch if needed. | ||
| Common Mistakes | Rushing removal or tearing fabric; not cutting stitches; not testing adhesives; using overly aggressive solvents; relocating without stabilizing the fabric. |
Summary
Remove Embroidered Patches is a practical skill for anyone who loves customizing clothing. By understanding patch types, using the right tools, and following careful steps, you can Remove Embroidered Patches without damaging fabrics. Reusing patches on new garments extends their life and lets you express your style across multiple pieces. If you decide to relocate patches, carefully plan placement and secure them for lasting wear. With patience and practice, you’ll master patch removal tips, become proficient at reusing embroidered patches, and enjoy fresh, personalized looks from existing clothing.