
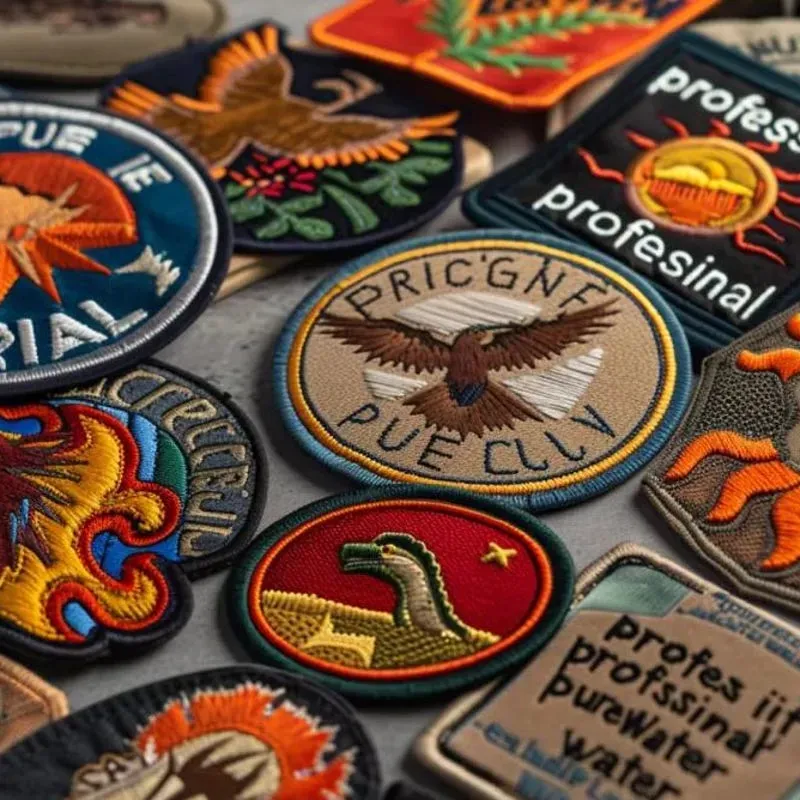
Custom embroidered patches offer a tangible way to showcase logos, slogans, or artwork with durability and texture. From bold borders to subtle embroidery, exploring custom embroidered patches design ideas helps align visuals with fabric and audience. Understanding the embroidery patch production process ensures you choose the right backing, material, and stitching technique. Applying quality tips for embroidered patches early in the workflow reduces errors and improves wash-fast colors. Careful selection of patch backing materials and adhesives, and guidance on iron-on vs sew-on patches, helps meet customer expectations.
In other words, these fabric insignia—often described as embroidered badges or sewn patches—serve branding and identification on uniforms and gear. LSI-friendly terms like fabric badges, embroidered emblems, or appliqué patches help search engines connect the concept to related topics such as backing choices and care. Viewed through a semantic lens, the same item can be discussed as cloth patches, badge insignia, or decorative embroidery patches, all sharing the idea of durable, color-rich stitching. This broader terminology supports broader SEO while keeping user intent in mind.
Custom embroidered patches: design ideas and practical considerations
This section explores custom embroidered patches design ideas and the practical decisions that shape a successful patch program. Key early choices include size, shape, thread color, density, and backing, all of which influence legibility and durability. When starting from a vector-like artwork file, you can translate a concept into stitch commands that preserve detail while keeping production efficient.
Custom embroidered patches design ideas often revolve around a bold focal element, a complementary border, and secondary text that remains legible at small sizes. To maintain clarity at stitching scale, plan for sufficient negative space and avoid overly intricate details that can blur after stitching. A digital mockup showing the patch on typical fabric backgrounds helps ensure the final result aligns with brand colors and garment colors before production begins.
The embroidery patch production process: from artwork to finished patch
In the embroidery patch production process, the artwork is digitized into stitch commands by a skilled digitizer. The digitizer maps colors, defines stitch types, and places underlay stitches to stabilize the fabric, setting the foundation for clean embroidery. This step is critical for achieving the intended balance between coverage and flexibility.
Once digitized, the file passes to the embroidery machine, which stitches onto a suitable backing. Edges are finished with merrow borders or satin stitching to create a durable, professional edge. After stitching, patches are stabilized, trimmed, and attached to their backing, followed by a final inspection for alignment, color accuracy, and the absence of loose threads.
Patch backing materials and adhesives: choosing the right backing for durability
Backing materials and adhesives play a critical role in patch performance. Sew on patches require a sturdy backing and high embroidery density to prevent fraying, while iron on patches use a heat-activated adhesive that bonds to fabric with heat. Other options, such as self-adhesive or Velcro-backed patches, cater to interchangeable branding and quick changes.
When selecting patch backing, consider the base fabric receiving the patch, as fabrics vary in stretch, texture, and weight. Testing patches on the actual garment material helps assess adherence, edge integrity, and color bleed. The right backing and adhesive combination will depend on how the patches will be worn, washed, and laundered over time.
Quality tips for embroidered patches: ensuring longevity and color fidelity
Quality tips for embroidered patches emphasize using high-quality embroidery threads and compatible stabilizers to prevent distortion. Needle size and stitch density impact appearance and wear: too few stitches can look sparse, while too many stitches can create stiffness and cracking with use.
Color management also matters during production. Even a well-chosen palette can shift if the backing or fabric causes color bleed. A digital proof helps align client expectations with the final patch, while finishing touches like a smooth merrow edge and secure backing attachment influence perceived quality. Providing washing guidance—such as turning patches inside out and using mild detergents—helps customers care for patches and extend their life.
Iron-on vs sew-on patches: benefits, limitations, and care
Iron-on vs sew-on patches presents a practical trade-off between convenience and durability. Iron-on patches offer quick application without sewing equipment, relying on heat-activated adhesive. However, repeated washing and abrasion can degrade the adhesive over time, reducing wear life in some environments.
Sew-on patches typically deliver greater durability in heavy-use settings like sports uniforms or outdoor gear. They remain secured by stitches and can withstand harsher washing cycles. Regardless of type, discuss pre-washing expectations with clients and provide clear care instructions to minimize peel and thread breakage.
Design strategies and branding consistency for patches: creating a cohesive series
Design strategies for patches focus on branding consistency and clear focal elements. A strong concept uses a central emblem with supporting text arranged for legibility, while borders and monograms can reinforce a unified look across a patch collection. For teams and brands, including elements like numbers, years, or slogans can deepen identity while maintaining visual coherence.
When planning a patch program, consider the scope of the series, minimum order quantities, digitization lead times, and the ability to customize color, size, and backing for different SKUs. A cohesive color system and standardized sizing help the entire collection feel intentional, making it easier for customers to recognize the brand across multiple products and occasions.
Frequently Asked Questions
What are custom embroidered patches and which custom embroidered patches design ideas should I consider?
Custom embroidered patches are fabric badges embroidered with logos, slogans, or artwork, finished with a durable edge and backing. For strong results, explore design ideas such as bold borders, a clear central emblem, and legible secondary text, while keeping size, shape, color choices, and contrast in mind. Provide a vector-like artwork file and request a digital mockup to preview the patch on typical fabrics.
What is the embroidery patch production process from concept to finish?
The embroidery patch production process typically starts with digitizing the artwork into stitch commands, followed by setting up the embroidery machine with the chosen backing. Then comes stitching, edge finishing (e.g., merrow or satin borders), trimming, and a final quality inspection for alignment and color accuracy before delivery.
What are quality tips for embroidered patches to ensure durability and color accuracy?
Key quality tips for embroidered patches include using high-quality threads and stabilizers, selecting appropriate needle size and stitch density, and validating color references with a digital proof. Ensure clean trimming, a smooth edge, and proper backing attachment, and provide care guidance to preserve colors through washing.
Iron-on vs sew-on patches: how do they differ and which should I choose?
Iron-on patches use a heat-activated adhesive for easy application, while sew-on patches rely on stitched attachment for greater durability in rugged use. Consider washing frequency, fabric type, and wear environment when choosing, and provide clear care instructions to minimize adhesive wear or thread stress.
Patch backing materials and adhesives: which backing should I choose for different fabrics and uses?
Backing options include sew-on, iron-on adhesives, self-adhesive, and Velcro-backed patches. Each has pros and cons for durability, washing resistance, and comfort depending on fabric type. Test patches on the target garment material and select backing that pairs well with care instructions and the intended application.
How can I ensure custom embroidered patches look great on different fabrics and withstand washing?
To ensure consistent results, use digital mockups on representative fabric backgrounds, validate color and stitching with a proof, and test patches on the actual garment material. Plan for appropriate stitch density, edge finishing, and backing compatibility, and provide clear care instructions to help patches endure repeated washing and wear.
| Aspect | Key Points | Notes/Examples |
|---|---|---|
| Purpose and scope | Patches display logos, slogans, or artwork; versatile for teams, schools, clubs, brands, or merchandise; provide tactile, durable branding. | Used across uniforms, bags, hats, and more to reinforce identity. |
| Design considerations | Key decisions on size, shape, thread color, density, and backing; begin with clear concept and vector-like artwork; ensure legibility. | Example: a 1.5 inch patch balances detail and legibility; irregular shapes may need extra backing. |
| Color management | Match thread colors to catalogs; consider colorfastness; avoid low contrast with fabric; request digital mockups. | Digital proofs help preview patch appearance on fabric background. |
| Production process | Digitization by a skilled digitizer; embroidery machine stitches on backing; choose backing (fabric, iron-on, sew-on); add edge finishing (merrow, satin); final inspection. | Edge finishing creates a clean, durable edge; backing chosen by application and durability. |
| Materials and backing | Backing options: sew-on, iron-on, self-adhesive, Velcro; consider durability and washing resistance; test patch on the target fabric. | Test adherence, color bleed, and edge integrity on the exact garment material. |
| Quality tips | Use high-quality threads and stabilizers; appropriate needle size and stitch density; provide digital proof; finish with clean trimming and secure backing; follow washing guidance. | A well-balanced patch avoids stiffness or sparsity and maintains color fidelity. |
| Iron-on vs sew-on care | Iron-on is convenient but adhesives may degrade with washing; sew-on is more durable for heavy use; discuss pre-wash expectations and care. | Provide care instructions to minimize peel and thread breakage; turn garment inside out for washing. |
| Design ideas and branding | Use a clear focal element, supporting text, borders, emblems, and monograms; maintain a consistent color system; plan for series scope and lead times. | Align patches for teams (numbers, year) or brands (name, slogan) for a cohesive collection. |
| Common mistakes and troubleshooting | Underestimating stitch count; backing that won’t withstand washing; unclear design brief; missing color references; lack of mockups; insufficient testing. | Keep test patches and adjust backing, stabilizer, and needle size as needed. |
| Conclusion and next steps | Core principles: design with intent, digitize with precision, produce with care, finish with detail. | Plan for longevity and consider iron-on vs sew-on and backing types. |
Summary
Conclusion: Custom embroidered patches provide a tangible way to express identity, branding, and teamwork. By focusing on thoughtful design ideas, a robust production process, and practical quality tips, patch programs deliver durable, vibrant patches that perform across garments and accessories. Whether marking training patches, event badges, or brand seals, the core principles remain: design with intent, digitize with precision, produce with care, and finish with attention to detail. As you explore iron-on or sew-on options and backing materials, keep end use and longevity in mind to ensure patches withstand repeated wear and washing while representing your brand confidently.