
Embroidered design is a timeless craft that blends color, texture, and personal expression to transform fabric into art. Whether you’re drawn to hand embroidery techniques or curious about machine embroidery tips, starting with simple stitches builds confidence. A solid stitches guide for beginners helps you learn tension, alignment, and the rhythm of smooth lines, while exploring embroidery design ideas. As you practice, you’ll discover beginner embroidery projects that suit different fabrics and styles, from airy linens to sturdy denims. This journey favors clear steps, practical tools, and patient practice to unlock your creative potential through a well-planned Embroidered design path.
Beyond the phrase embroidered design, similar ideas surface in stitched artwork, needlework motifs, and textile embellishments that add personality to fabric. This approach highlights practical techniques, from choosing fabrics and threads to planning motifs, much like a stitches guide for beginners. Whether you call it hand stitching or machine embroidery, the core goals are the same: clean tension, balanced color, and durable finishes. Exploring embroidery design ideas and beginner embroidery projects through a practical lens helps new makers build confidence while enjoying the process.
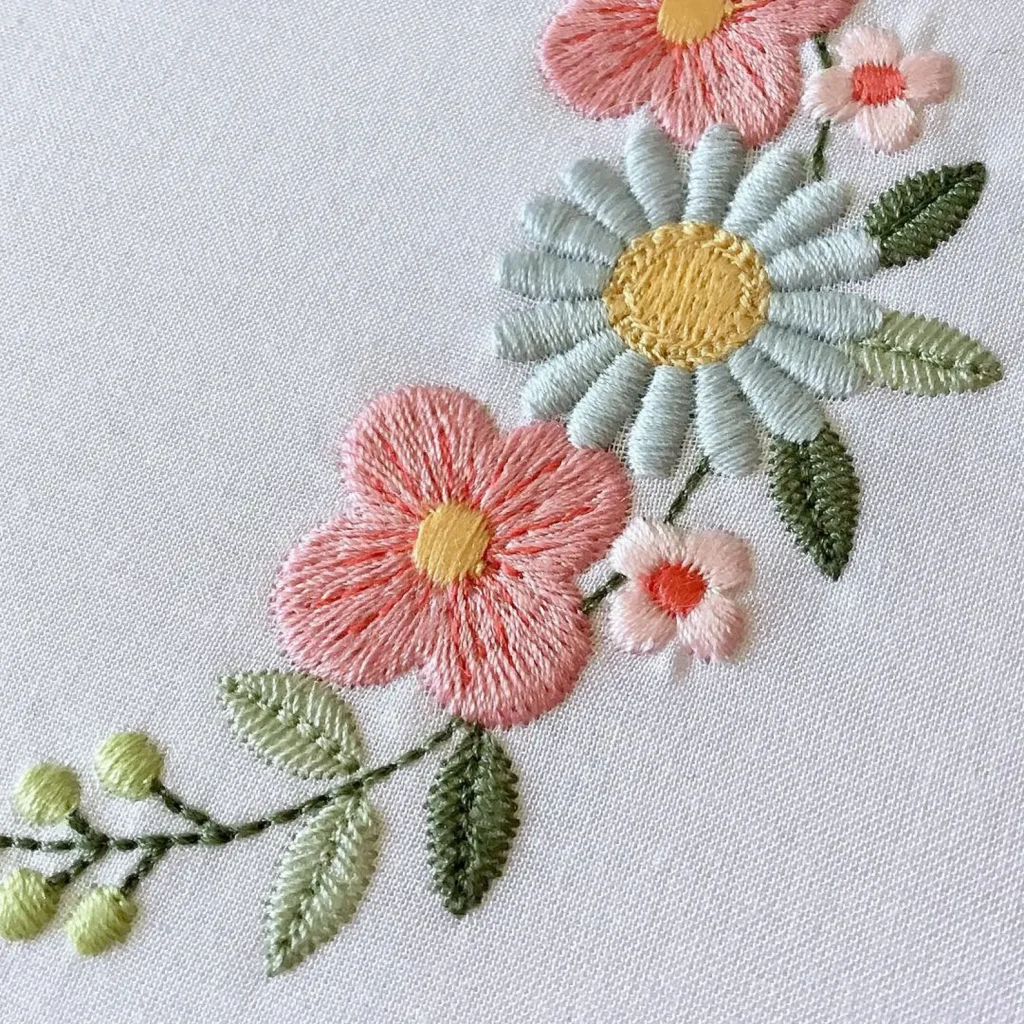
Embroidered design Foundations: Getting Started for Beginners
Embroidered design begins with an understanding of texture, color, and the tactile pleasure of stitching. For beginners, start with a simple motif—such as a flower or leaf—and focus on even tension and consistent stitch length. By exploring hand embroidery techniques and drawing from embroidery design ideas, you’ll see how basic stitches can express mood and detail.
Choose your path carefully: hand embroidery vs. machine embroidery. The goal is to build confidence through small, repeatable exercises that translate into larger pieces. Incorporating beginner embroidery projects into practice helps you see tangible results while you refine control, rhythm, and decision‑making in every stitch.
Hand vs. Machine: Choosing Your Embroidered Design Path
Hand embroidery techniques emphasize texture, patience, and tactile control, making this path ideal for small projects and personalized touches. Starting with simple motifs allows you to master steady tension, clean line work, and consistent filling so your Embroidered design feels deliberate and expressive.
Machine embroidery tips offer precision and repeatable results, great for lettering, bold shapes, or repeating motifs across multiple items. Even so, beginners benefit from learning basic hand stitches to inform design choices and troubleshoot when the machine isn’t achieving the desired look.
Essential Tools and Materials for Embroidered Design Success
Starting with the right tools saves time and improves outcomes. Invest in a hoop or frame to keep fabric taut, appropriate embroidery needles, and a thread range that covers both light and heavy applications. A few metallic or specialty threads can add contrast and dimension to your Embroidered design.
Stabilizers for machine embroidery and heavier fabrics are important, along with sharp scissors, transfer tools, and a stable workspace. Choosing stable fabrics like cotton or linen supports cleaner stitches, while water-soluble pens or transfer paper helps you plan and execute your design with greater accuracy—especially useful for beginner embroidery projects.
Core Stitches and a Stitches Guide for Beginners
Core stitches such as backstitch, running stitch, satin stitch, and French knot form the heartbeat of any Embroidered design. These four stitches enable outlines, fills, texturing, and tiny details, giving you a versatile toolkit to build your practice.
This stitches guide for beginners helps you gain confidence: practice each stitch on scrap fabric to observe tension and length, then apply the learned technique to small motifs. As you grow more comfortable, combine stitches to create depth, shading, and nuanced line work in your Embroidered design.
Transferring Designs and Planning Your Embroidered Design
Transferring a design accurately is a key skill. Use tracing paper, a lightbox, or water-soluble pens to lay out the motif on fabric, and mark reference points to keep alignment consistent across multiple placements.
Plan your Embroidered design by testing on a scrap first, centering the motif, and previewing how colors and stitches will interact. These planning steps help you visualize the final piece and ensure that your beginner embroidery projects progress with intention and clarity.
Starter Projects and Design Ideas to Build Confidence
Starter projects provide practical practice and quick wins. Ideas include mini coaster motifs, initials on fabric labels, patch embellishments, and decorative samplers that demonstrate consistency across a set of small motifs.
Each project reinforces fundamentals—from transferring and stitching to finishing and care—turning simple motifs into confident Embroidered design practice. Explore embroidery design ideas that spark creativity while keeping the workload manageable for beginner embroidery projects.
Frequently Asked Questions
What is an Embroidered design and how do hand embroidery techniques contribute to its texture?
An Embroidered design is a decorative pattern created by stitching thread onto fabric. Hand embroidery techniques contribute texture, dimension, and a handmade character to the design, with control over stitch length, tension, and color blending. Start with a simple motif for your Embroidered design and gradually add shading or multiple stitches as you gain confidence.
How do I choose between hand embroidery techniques and machine embroidery tips for an Embroidered design?
For an Embroidered design, choose based on your goals: hand embroidery techniques offer texture, flexibility, and a slower, meditative pace, while machine embroidery tips deliver precise, repeatable results and quicker production. Beginners often start with hand embroidery to learn tension and stitch control, then try machine embroidery for larger projects or lettering. You can even combine both approaches across different Embroidered design elements as you grow.
What essential stitches should I learn in a stitches guide for beginners for an Embroidered design?
Key stitches to learn in a stitches guide for beginners include backstitch for clean outlines, running stitch for texture, satin stitch for solid fills, and French knots for small focal points. Mastering these four stitches gives you a solid foundation for most Embroidered design projects. Practice on scraps before committing to your main piece to build confidence.
What embroidery design ideas can inspire beginner embroidery projects for an Embroidered design?
Great embroidery design ideas for a beginner Embroidered design include a simple floral motif, a geometric leaf pattern, an initial or name patch, a tiny animal or icon, and a decorative sampler grid. These embroidery design ideas translate well into beginner embroidery projects and help you build consistency across stitches. Start small and gradually combine motifs into a cohesive piece.
What tools and materials do I need for an Embroidered design and how can I start with beginner embroidery projects?
For an Embroidered design, gather a hoop or frame, appropriate embroidery needles, cotton floss or embroidery floss, stable fabric (cotton or linen), scissors, and transfer tools. If you’re planning machine embroidery, include stabilizers and a digitizing option. With these tools and materials, you can begin with beginner embroidery projects that focus on steady tension and clean edges.
What are the best methods to transfer an Embroidered design for beginners to ensure clean stitches in beginner embroidery projects?
Best methods to transfer an Embroidered design for beginners include tracing onto transfer paper, using a lightbox, or a water-soluble pen. Test the design on a scrap fabric first to check alignment and tension before you stitch your main piece. Center the motif, mark reference points, and do a small test stitch to ensure clean results in your beginner embroidery projects.
| Topic | Key Points | Notes / Tips |
|---|---|---|
| What is Embroidered design and why it matters | A decorative pattern stitched onto fabric; beginners start with simple motifs (flower, leaf, geometric shapes) to learn control, tension, and consistency; with practice, designs can evolve to shading, gradients, or intricate line work. | Focus on simple motifs to build confidence; steady progress matters more than speed. |
| Hand embroidery vs machine embroidery: choosing your path | Two paths to a stitched design. – Hand embroidery emphasizes texture, patience, and hand control; ideal for small projects; common stitches include backstitch, running stitch, satin stitch, French knots, lazy daisy. – Machine embroidery offers precision and repeatable results via software, stabilizers, and digitized designs; great for lettering and bold shapes; beginners should still learn basic hand stitches to inform design and troubleshooting. |
Hand stitches build foundation; machine embroidery is efficient for repetition; learning both helps with design decisions. |
| Essential tools and materials for a successful Embroidered design | Core items: hoop/frame; embroidery needles; threads (cotton floss or embroidery floss, with metallic or semi-synthetic options); fabric (stable like cotton or linen); scissors and transfer tools; stabilizers (tear-away or cut-away for machine embroidery/ heavier fabrics). | Prepare a dedicated workspace; choose appropriate stabilizers for your project. |
| Core stitches and a quick stitches guide for beginners | Four foundational stitches: – Backstitch: outlines and lettering – Running stitch: texture and soft lines – Satin stitch: solid color fills – French knot: small textured dot; practice for centers of flowers |
Practice these to gain control of tension and consistency; work on small shapes first. |
| Transferring a design and planning your Embroidered design | Use tracing paper, lightbox, or water-soluble pen to transfer a simple motif; center the motif; mark reference points for alignment; test stitch a small swatch to check tension, length, and color before committing to the full piece. | Test before full piece; center alignment is key. |
| A practical beginner project lineup to build confidence | Projects to practice and build confidence: – Mini coaster motif (backstitch + satin fill) – Personal initials on fabric label (backstitch lettering) – Patch embellishment (small stitches and shapes) – Decorative sampler (grid of tiny motifs) – Simple textile applique (basic shape with satin edge) |
Begin with simple, repeatable projects to reinforce technique. |
| Color, contrast, and design ideas to elevate your Embroidered design | Color strategy and texture plans: – Start with 2–3 colors; add more as you gain confidence – Use high contrast for motifs on busy fabrics; tonal work for subtle sophistication – Mix satin and running stitches to create light and shade; draw inspiration from nature, geometry, or everyday icons |
Plan palettes and textures before stitching; let design ideas guide color choices. |
| Finishing, care, and maintenance of your Embroidered design | Wash gently (hand wash or delicate cycle); remove stabilizers per instructions; iron with a cloth between embroidery and iron; store finished pieces flat or rolled to prevent crushing. | Follow care instructions to preserve stitches and fabric. |
| Troubleshooting common issues in Embroidered design | Puckering: use properly sized hoop and suitable fabric; avoid overtightening. Uneven stitches: check needle size, tension, and stitch length; practice on scrap. Frayed edges: choose compatible fabrics; finish edges with a zigzag or overlock. |
Test tensions regularly; adjust as you grow more confident. |