
Embroidered design techniques fuse artistry with engineering, turning a concept into a tangible textile piece and inviting makers to balance creative vision with precise execution, texture with stability, and personal style with reproducible results; in this journey, pragmatic guidance like machine embroidery design tips helps beginners gain confidence while seasoned crafters refine efficiency, expand capability, and push the boundaries of what fabric and thread can achieve together. From choosing fabrics and stabilizers to selecting embroidery stitches that deliver texture, sheen, and clean coverage, the right combination helps you avoid puckers and gaps, guides decision making for density and underlay, and creates a cohesive visual language across stitches such as satin, fill, and running stitch, ensuring the final piece remains durable and true to the original concept while staying adaptable to home machines or industrial equipment. Embroidery digitizing acts as the blueprint, translating artwork into stitch coordinates and layering colors so machines follow a logical path that respects fabric behavior, thread tensions, and color relationships, with careful attention to backstitching, trimming, and sequence planning that minimize snags and movement, whether you’re preparing a logo, floral motif, or decorative border for a wide variety of applications. Finishing techniques for embroidery close the loop by solving practical challenges after stitching—hoop stability, stabilizer choice, and edge cleanup, followed by thoughtful pressing, washing, and storage considerations that preserve gloss, prevent distortion, and extend life; these finishing steps transform a technically sound project into a polished, gallery-ready piece that holds up to daily wear and laundering while maintaining consistent color and texture. Finally, consider the material pipeline from concept to final reveal by evaluating fabric selection for embroidery, thread brands, needle sizes, and machine settings early in the design process, so you can anticipate how fiber content, weave, and stretch will influence density, pull, and visibility; this holistic approach aligns with long-term goals of versatility and repeatability, letting you reproduce high-quality results across projects with confidence and creative momentum.
Viewed through an adjacent lens, these concepts align with needlework methods, stitching strategies, and digital embroidery preparation, all aimed at turning an image into a repeatable, machine-friendly plan. By thinking in terms of textile embellishment, threadwork planning, and stabilizer-driven workflows, creators can optimize outcomes across fabrics, threads, and scales without locking into a single technique. LSI principles encourage including related terms such as decorative stitching, color blocking, vector tracing, and fabric stabilization to broaden relevance and match diverse search intents. Together, these alternative terms help readers and search engines connect the practical craft of embroidery with the underlying concepts of design, planning, and execution.
Embroidered design techniques: A holistic approach to stitches, digitizing, and finishing
Embroidered design techniques are not merely decorative; they provide a framework that unites three core pillars—stitches, digitizing, and finishing—into a cohesive workflow. When you adopt this holistic view, you plan each stitch with purpose, anticipate how digitizing will translate those lines into precise machine moves, and imagine how finishing touches will protect and enhance the final piece. This integrative mindset keeps projects aligned with both artistry and engineering, whether you work by hand, on a home machine, or with commercial embroidery equipment.
This trio—stitches, embroidery digitizing, and finishing—interacts like a well-tuned system. The choice of embroidery stitches sets texture and coverage; digitizing translates the design into a stitch map; finishing techniques for embroidery seals durability and polish. By studying and practicing all three pillars together, you can elevate ordinary designs into durable, professional works of wearable or decorative art. This cross-pillar perspective also helps in selecting fabrics and threads that maximize performance.
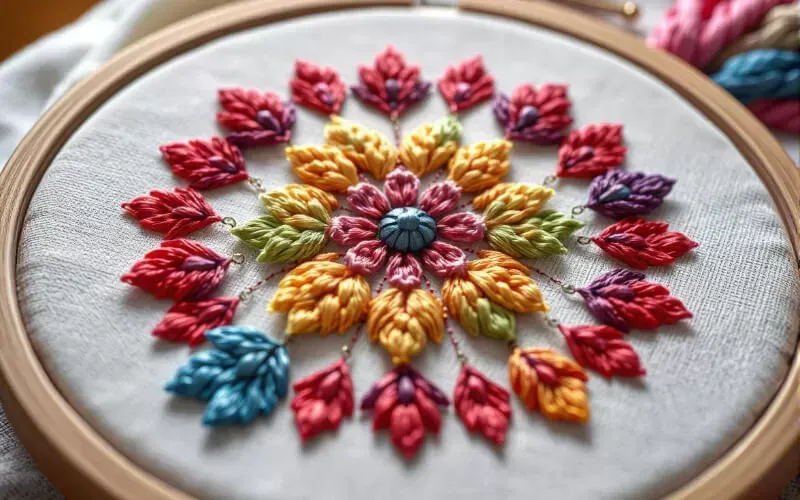
Stitches that shape texture: selecting embroidery stitches for depth and shine
Texture and sheen come from thoughtful stitch choices. Satin stitches offer solid bands ideal for lettering and bold outlines, while fill stitches cover large areas efficiently; the balance of density matters to avoid fabric showing through or puckering. Running stitches provide delicate lines for framing or motion, and French knots add tiny tactile centers that bring floral motifs to life.
Fabric interacts with stitch selection: tightly woven fabrics tolerate denser fills and more satin work, whereas lighter textiles benefit from lighter densities and stabilizers. When stitching on knits, opt for stretch-friendly stitches and a stabilizer that lets the fabric breathe. Monitoring stitch density, underlay, and pull compensation helps keep a design looking clean and consistent on a variety of fabrics, which ties back to fabric selection for embroidery.
Digitizing that makes art wearable: turning artwork into embroidery with precision
Embroidery digitizing is the blueprint that translates artwork into stitch coordinates a machine can follow. A strong workflow turns line weight, color, and texture into a stitch plan using appropriate stitch types, densities, and sequences. The result is embroidery that faithfully renders the original concept while maintaining durability and efficient machine operation.
Think in layers: plan color strategy, grouping by tonal relationships, and sequencing so that later stitches don’t obscure earlier ones. For intricate areas, combine underlay, fill, and outline stitches to preserve detail. Keep file formats and compatibility in mind (DST, PES, EXP) and run small tests to verify path accuracy and edge sharpness before final production. This is where machine embroidery design tips come into play.
Finishing techniques for embroidery: sealing durability and professional polish
Finishing is where decades of practice pay off. Stabilizers chosen to complement fabric, proper hooping, and correct tension set the stage for clean edges. After stitching, trim jump stitches, secure thread ends, and use light hand reinforcement on dense areas to reduce lint and snag risk.
Finishing also covers care and presentation: a light pressing with a cloth to calm puckers, careful handling of delicate items, and clear care instructions for the end user. Long-term durability depends on choosing colorfast threads and stable stabilizers and advising appropriate wash temps and detergents. These finishing touches ensure a professional, lasting result.
Machine embroidery design tips for consistent results
Consistency begins with a reliable workflow: test swatches, precise hooping, and stable machine settings. Plan the stitch path to minimize abrupt turns, balance density with fabric support, and keep feed dogs smooth by using quality thread and needles. Regularly check calibration, sequence color changes to reduce thread breaks, and document settings for future projects.
Additionally, analyze edge definition, underlay choice, and pull compensation to prevent distortion on curves. When you encounter registration drift, re-hoop or adjust the project’s alignment. These machine embroidery design tips help maintain repeatable results across multiple runs and fabrics.
Choosing fabric and stabilizers: fabric selection for embroidery and stabilizers in the workflow
Fabric choice governs how stitches sit, how much density is needed, and how well the design will survive laundering. Select fabrics with appropriate weave, weight, and stretch, then pair them with stabilizers that match the project—tear-away for woven textiles, cutaway for heavy fills, or specialty stabilizers for knits.
Always run a swatch to check how the fabric behaves under hooping and stitching, and test different densities and underlay levels. Document fabric types, thread brands, needle sizes, and stabilizer choices to refine your workflow for future embroidery projects.
Frequently Asked Questions
Which embroidery stitches are foundational for mastering embroidered design techniques and how should you apply them for texture and coverage?
Foundational embroidery stitches include satin stitches for solid, smooth areas; fill stitches for large color blocks; running stitches for delicate outlines or motion; and French knots for small, tactile centers. Choose fabrics and stabilizers that support your stitch choices, test on swatches to adjust density, and plan underlay to stabilize the surface. This approach reflects the core embroidered design techniques of selecting stitches, balancing fabric behavior, and preparing for finishing.
How does embroidery digitizing influence the accuracy of embroidered design techniques, and what is a practical workflow for beginners?
Embroidery digitizing is the blueprint that turns artwork into stitch coordinates. A practical workflow: simplify the design, select appropriate stitch types (run for outlines, satin for fills, fill for color blocks), plan density and underlay, organize colors into layers, save in a machine-friendly format, and run tests on swatches to verify path accuracy and edge sharpness.
What finishing techniques for embroidery most effectively elevate projects and ensure longevity?
Finishing techniques for embroidery include choosing the right stabilizers, proper hooping and tension, trimming jump stitches, and a careful pressing routine with a pressing cloth. These steps protect thread integrity, reduce distortion, and extend durability through laundering and wear.
In choosing fabric selection for embroidery, what machine embroidery design tips help maintain stitch quality across different materials?
Fabric selection for embroidery matters: dense weaves support heavy fills, while lightweight or knit fabrics need stretch-friendly stitches and appropriate stabilizers. Apply machine embroidery design tips by matching stabilizer to fabric weight, adjusting stitch density, and always testing on swatches that resemble the final material.
How do you balance density and underlay when applying embroidered design techniques to prevent puckering?
To prevent puckering, manage stitch density and use the right underlay. Start with a suitable underlay (micro-underlay for delicate fabrics or a trailed underlay for dense fills), then gradually adjust density and select an appropriate stabilizer. Always test on a fabric swatch to verify edge sharpness and fabric behavior.
What are common pitfalls in multi-color embroidery and how can planing color strategy and digitizing help prevent them?
Common pitfalls in multi-color designs include registration drift, thread breaks at corners, and color bleed. A solid digitizing plan—clear color blocks, correct stitch order, and well-placed underlay—paired with testing and careful finishing reduces these risks and yields clean, vibrant results.
| Pillar | Key Points |
|---|---|
| Stitches | Stitches are the building blocks. Key types include satin for texture and solid color, fill for large color areas, running for outlines, and French knots for small centers. Density, underlay, and pull compensation affect coverage and fabric behavior. Balance stitch types to fabric (dense weaves support more fill; knits need stretch-friendly stitches and stabilizers). Practical tips: test swatches, adjust stitch length and density in small increments, choose stabilizers matching fabric weight and end use, and monitor thread quality to avoid looping or fraying. |
| Digitizing | Digitizing is the blueprint: converting artwork into stitch coordinates and machine instructions. Start with a clean design by simplifying details and planning line flow; vectorizing key outlines helps create a scalable base. Choose stitch types deliberately (run for outlines, satin for fills, long-and-short or fill for color blocks) and combine underlay, fill, and outline to preserve detail. Plan density and underlay per fabric type and hoop stability; group colors by tonal relationships and print order, and stage the design in layers. Save stitches in machine-friendly formats (DST, PES, EXP, etc.) with a jump stitch plan, and test on swatches. Quality checks verify path accuracy and scaling to avoid distortion. |
| Finishing | Finishing covers stabilization, hooping, trimming, pressing, and fabric care. Stabilizer choice should complement fabric and design; woven fabrics may use iron-on or tear-away, while delicate knits may require more give or cutaway. Hoop tension affects registration; re-hoop if misaligned. Trim jump stitches and manage thread ends to reduce bulk; lightly reinforce dense areas if needed. Apply finishing touches like a light press with a pressing cloth, and avoid direct heat to protect threads. Plan for longevity with appropriate wash temps, detergents, and colorfast threads and stable stabilizers to prevent color bleed and distortion. |
| Workflow | Putting it all together: Concept and sketch, digitize with intent, stitch and inspect, finish and care, iterate and document. Concept and sketch define the design, color blocks, and fabrics; digitize with intended order, density, and stabilizers; stitch a test swatch and inspect edge definition; finalize with finishing and care steps; document fabric types, thread brands, needle sizes, and machine settings for future projects. |
| Common Pitfalls | Puckering on delicate fabrics—increase stabilizer, adjust underlay, and reduce density; thread breaks on tight curves—use smaller needle, shorter stitch length, and smooth turns; color bleeding after wash—use colorfast threads, test wash, and select stabilizers; registration drift on multi-color designs—verify machine calibration, re-hoop, and sequence color changes to minimize repositioning. |
Summary
Embroidered design techniques fuse artistry with practical engineering to create textiles that endure. This descriptive overview highlights how stitches, digitizing, and finishing work together to turn a concept into a durable, beautiful textile piece. From selecting stitches to ensure texture and coverage, to translating artwork into stitch coordinates with careful digitizing, and finally applying finishing steps that stabilize and protect the work, the three pillars form a cohesive workflow. A thoughtful process—concept and sketch, digitize with intent, stitch and inspect, finish and care, and document results—helps designers achieve reliable, repeatable outcomes. With practice, testing, and documentation, embroidered design techniques become a sustainable practice that blends creativity with precision, delivering professional-grade results that stand the test of time.