
Eye-Catching Custom Patches grab attention on garments and tell a story beyond simple decoration. This introductory guide shows how color theory for patches, bold shapes, and precise sizing can elevate branding. Smart use of custom patch design ideas helps you plan layouts for hats, jackets, bags, and uniforms. Choosing patch shapes and sizes that frame your emblem while staying feasible to produce at scale. And embroidery patches tips provide practical notes on borders, stitches, and durability to keep patches looking great over time.
In broader terms, these designs are frequently described as embroidered badges, fabric emblems, or branded insignias that decorate apparel. Using synonyms such as textile patches, appliqués, or cloth badges helps align content with how people search for similar products. Latent semantic indexing favors linking related ideas like patch design ideas, color theory for patches, and edge finishes to signal topic depth. By framing eye-catching patches through these alternative terms, you reinforce relevance for both readers and search engines while keeping the language natural.
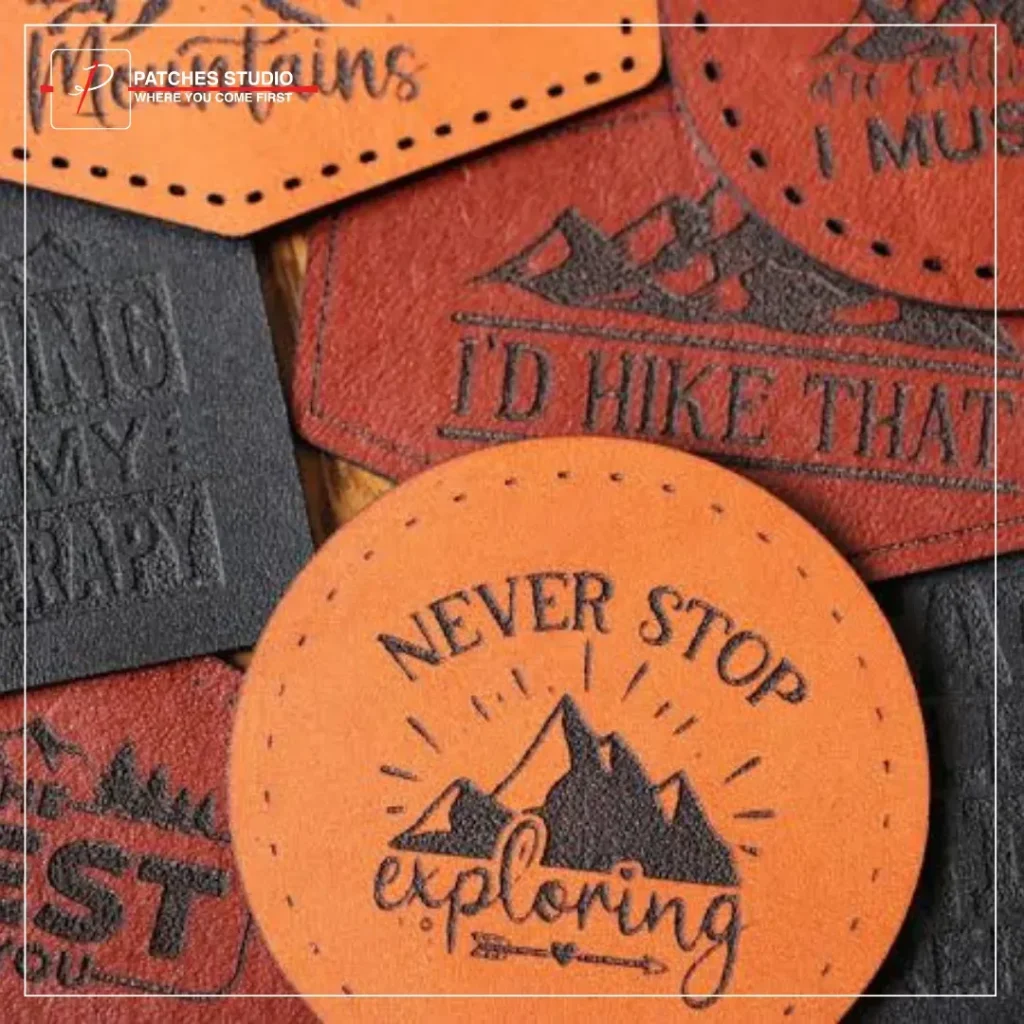
Eye-Catching Custom Patches: Color, Shape, and Size Synergy
Color, shape, and size are the three levers that power patch impact. By applying color theory for patches, you can build a harmonious palette limited to 2–4 thread colors, map each hue to a Pantone reference, and test swatches on fabrics similar to your final garments. This ensures your patch reads clearly from a distance and on diverse lighting, reinforcing brand recognition without creating production confusion.
Shape and size work in tandem with color to tell the story of your emblem. Start by selecting a silhouette that matches the emblem’s identity—badge-style shapes, circles, and shields offer familiarity, while nonstandard contours can convey a distinctive character. Plan for scalable designs that translate from small hats (about 1.5 inches) up to 4 inches or larger, and choose edge treatments that reinforce readability and durability across garments.
Custom Patch Design Ideas: Monochrome to Layered Depth
Custom patch design ideas span a spectrum from monochrome sophistication with a pop of color to bold, retrofuturistic looks. Practical concepts include emblems with negative space for a clean silhouette, layered depth achieved through selective color transitions, and the classic club badge using strong borders and two-tone schemes. These ideas align with the principle of custom patch design ideas to balance visual impact with production feasibility.
To turn these ideas into reality, start from a clear concept and translate it into a vector-friendly design (AI, EPS, or SVG). Limit color counts to 2–4 thread colors, map each layer to a specific thread, and plan the design so key elements stay legible at small sizes. The result should be production-ready while preserving the intended visual hierarchy and brand message.
Color Theory for Patches: Mapping Colors with Pantone and Contrast
Color theory for patches centers on forming a harmonious, legible palette that remains effective on various fabrics and under different lighting. Embrace contrast between foreground embroidery and background to improve readability, and use purposeful saturation—vivid accents against neutral bases—to draw attention without overwhelming the design. By starting with a primary color and adding two complementary hues, you create a patch that stands out on hats, jackets, or bags.
Use color mapping and Pantone references to minimize miscommunication with your embroidery team. Keeping to 2–4 primary colors simplifies production, reduces costs, and helps maintain consistency across runs. Always test swatches on fabrics similar to your target garments, and consider how material color interactions change after laundering or on camera.
Patch Shapes and Sizes: Designing for Legibility and Production
The shape of a patch communicates identity as powerfully as its imagery. Traditional shapes like circles and shields feel familiar, while irregular contours can give your patches a distinctive character when aligned with the logo’s geometry. When deciding on shape and size, balance aesthetics with production feasibility and ensure the silhouette remains recognizable across sizes.
Plan for scalability, testing three sizes in the early stages to verify which details survive scaling. Typical size breakpoints include small (1.5–1.75 inches), medium (2.0–3.0 inches), and large (3.5–5.0+ inches). Edge treatment matters too—merrow borders are durable and classic, while satin or stitched edges read as modern. The border color should reinforce the outline or blend with the garment for a cohesive look.
Embroidery Patches Tips: Edges, Stitches, and Finishes for Durability
Embroidery patches tips include choosing edge styles, stitch types, and finishes that read well from a distance and wear well over time. A merrow edge provides a thick, durable frame, while a satin edge offers a sleeker, more contemporary line. Pick stitches that suit the design — fill stitches for solid color blocks, and satin or stem stitches for precise lettering and fine details.
Finishes like chenille or felt elements can add tactile premium appeal, but consider wash durability and the patch’s intended wear. Backing choices—iron-on for quick consumer use, sew-on for durability, or removable backings like Velcro for interchangeable patches—should align with the garment type and user needs. Always validate compatibility with wash and wear conditions before final production.
Production-Ready Workflow: From Concept to Vector to Proof
A production-ready workflow starts with a solid concept and a clean vector file. Convert artwork to AI, EPS, or SVG, simplify textures into bold shapes, and limit colors to 2–4 thread colors to streamline setup and reduce cost. Plan color mapping carefully so each layer has a defined thread color, ensuring strong contrast and readability once stitched.
Prepare production notes that specify backing type, edge style, and recommended garment types, and request a physical swatch at target sizes to confirm legibility and color accuracy. This production-ready mindset—paired with a clear size break plan and a detailed brief—helps manufacturers scale patches reliably, whether for a sports team, a fashion line, or a club, while maintaining the eye-catching impact described in the guide.
Frequently Asked Questions
In Eye-Catching Custom Patches, how does color theory for patches influence legibility and impact?
Eye-Catching Custom Patches rely on color theory for patches to ensure legibility and visual impact. Start with a primary color that embodies your identity, limit the palette to 2–4 thread colors, and build high contrast between foreground embroidery and the patch background. Map each color to Pantone references and test swatches on fabrics similar to your garment to avoid misreads under different lighting.
How do patch shapes and sizes affect Eye-Catching Custom Patches on hats, jackets, and bags?
For Eye-Catching Custom Patches, choose shapes that match the emblem and plan sizes that stay legible—from 1.5–2 inches on hats up to 3–4 inches for jackets. Consider border options (merrow or satin) and ensure the design scales cleanly by testing three target sizes. A clear silhouette and appropriate edge treatment improve recognition across fabrics.
What Eye-Catching Custom Patches design ideas from custom patch design ideas work across fabrics and products?
Eye-Catching Custom Patches design ideas include a monochrome base with a bold accent, retrofuturistic metallic threads, emblems with negative space, layered depth with minimal shading, and a classic club badge. Each idea leverages color, shape, and size to maximize impact while staying production-friendly.
What embroidery patches tips should I follow when creating Eye-Catching Custom Patches to ensure durability and readability?
Embroidery patches tips include selecting durable edge styles, appropriate stitch types, and a suitable backing, while limiting colors to 2–4. Prepare production notes and test a physical swatch at target sizes to confirm legibility and color accuracy before full runs.
How can I apply color theory for patches in Eye-Catching Custom Patches to improve color mapping and reduce miscommunication with the embroidery team?
Use color theory for patches to create a clear, communicative color map: define a 2–4 color palette, map each color to a Pantone reference, and assign thread colors to each design layer. Provide a production brief with border, edge, and garment recommendations, then validate with a printed swatch under typical lighting.
What common pitfalls should designers consider for Eye-Catching Custom Patches and how can embroidery patches tips help avoid them?
Common pitfalls include too many colors, fine details that vanish at small scales, poor contrast on busy fabrics, inconsistent sizing, and material clashes. Embroidery patches tips recommend simplifying details, restricting colors, testing on representative fabrics, and obtaining proofs before large runs.
| Key Point | Focus / Summary | Practical Takeaways |
|---|---|---|
| Color Theory | Color is the first thing people notice and should be limited, harmonious, and legible across lighting and fabrics. Establish a primary color that embodies your identity and pair it with 2 complementary hues to create contrast without clashing. Map colors to Pantone swatches to avoid miscommunication with embroidery teams. | – Use 2–4 primary colors; – Test swatches on similar fabrics; – Ensure high foreground/background contrast; – Consider lighting differences when choosing colors. |
| Shape and Size | The silhouette communicates identity as much as imagery. Choose traditional shapes for versatility or nonstandard contours for distinctiveness, while ensuring legibility at target sizes (1.5–2 inches minimum, up to larger scales). | – Match shape to emblem (badge/shield, circular, irregular); – Plan for scalability (test 1.5–4 inches); – Prioritize legibility; – Select edge treatments that support the design. |
| Edges, Stitches & Finishes | Edge style and stitch type affect readability and feel from a distance. Merrow borders are durable; satin edges read modern. Use fill, satin, or stem stitches for detail, and consider finishes like chenille for texture. | – Choose border (merrow vs satin); – Use appropriate stitch types for details; – Consider finishes for texture; – Balance cost and wash durability. |
| Materials & Backing | Backing determines attachment and longevity. Iron-on for convenience; sew-on for durability; consider Velcro or removable backings for versatility; padding adds depth but may affect flexibility. | – Pick backing type per use case; – Test iron-on heat tolerances; – Balance durability with wear and comfort. |
| From Concept to Vector | A smooth handoff starts with a strong design process. Move from concept sketch to vector files (AI, EPS, SVG); limit colors (2–4); map colors for production; include clear production notes; request proofs. | – Create clean vector artwork; – Limit colors to 2–4; – Define production notes and size breakpoints; – Request physical swatch proofs. |
| Design Ideas & Use Cases | Practical ideas show how color, shape, and size work together: monochrome with a bold accent; retrofuturistic metallics; negative space for legibility; layered depth; club badges convey heritage. | – Test design concepts in small revisions; – Use negative space to simplify stitches; – Favor bold, legible shapes. |
| Common Pitfalls | Pitfalls include too many colors, tiny details that vanish, poor contrast on busy fabrics, inconsistent sizing, and material clashes. These reduce impact and increase production risk. | – Limit colors; – Avoid small text/details; – Check contrast on target garments; – Standardize sizes; – Validate materials. |
| Real-World Application | Case studies show patches thriving on varied items: sports club shields read strongly on caps; streetwear circular patches with high contrast become collectables. Strong color theory and size planning support versatility. | – Use strong color palettes; – Ensure readability at distance; – Align backing with application. |
| Production Workflow & QA | A production-ready workflow covers marketing keyword usage, vector prep, size testing, backing selection, color validation, production briefs, and physical proofs. | – Prepare vector files; – Test at multiple sizes; – Validate color accuracy with swatches; – Obtain proofs before large runs. |
| FAQ Snapshot | Design fundamentals include focal point, contrast, silhouette, limited colors, and placement. Color guidance remains 2–4 colors; most patches work on common fabrics with proper testing. | – Focus on 2–4 colors; – Verify fabric compatibility; – Test iron-on vs sew-on methods. |
Summary
Eye-Catching Custom Patches are a powerful branding tool that can transform apparel into a narrative and a recognizably cohesive identity. By applying color theory, thoughtful shape and size choices, and production-aware decisions around edges, materials, and backing, you can create patches that are striking, durable, and easy to produce. This structured approach—from concept to vector, through practical design ideas and a production checklist—ensures patches look great across garments while telling your story. Whether for a sports team, a fashion line, or a club, these principles help you deliver Eye-Catching Custom Patches that stand out, endure wear, and reinforce brand identity.